Mint packages NFTs
This guide describes how to use the Autonolas Protocol web app to mint software packages NFTs in the Autonolas Protocol. You can mint three types of packages: services, agents and components.
How packages are minted
To mint a package (also referred to as unit) in the protocol, it must have been published into a remote IPFS registry. Read how to publish packages with the Open Autonomy framework.
Minting a software package involves creating a metadata file that contains the package data and a pointer to the IPFS where the package is published. The Autonolas Protocol web app will automatically create and publish the metadata file on the IPFS registry, based on the package/unit information provided by the user in an online form. Then, it will interact with the protocol smart contracts to complete minting the package on-chain.
Upon completing the minting process, you will have an NFT representing your package in the Autonolas Protocol. See the figure below.

Minted NFTs offer an on-chain representation of the relationship between different software packages by mirroring their dependency relations. This helps the protocol Tokenomics to compute appropriate incentives, for example, based on how often a component is referenced.

Requirements
In order to mint a software package as an NFT, you must ensure that you have:
-
An address associated to either
-
a crypto wallet (e.g., Metamask or
-
a multisig contract (like Safe) which allows to connect via Wallet Connect.
In either case, the address must have funds for the chain that you wish to mint the package NFT.
-
The hash of the package that you want to mint on-chain, and which must have been published into a remote registry.
-
An NFT image URL. This image will be used to represent the minted NFT for the package on marketplaces such as OpenSea. You can use this sample image URL for testing purposes.
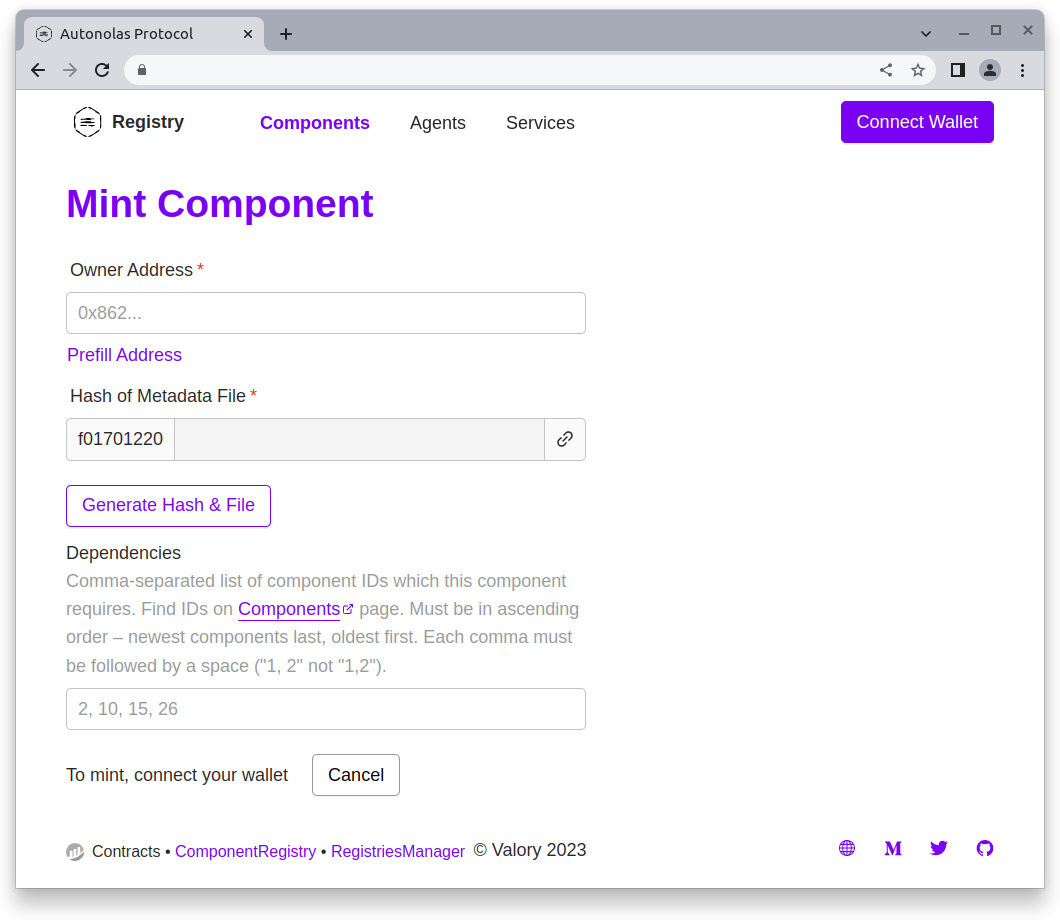
Mint a component
Connect your wallet to the Autonolas Protocol web app, open the components section and press the Mint button. Fill in the data of your component:
-
Owner Address. The wallet address of the component owner (starting with
0x...). It does not need to be the address of the connected wallet. -
Generate IPFS hash of the metadata file. Press the Generate Hash & File button and fill in the following data:
- Name. The name of the component.
- Description. A description of the component.
- Version. The component version, in the format,
<major>.<minor>.<patch>. - Package hash. The remote registry package hash starting with
bafybei...obtained when the component was published in the remote registry. - NFT Image URL. An URL pointing to an image. You can use this sample image URL for testing purposes.
By pressing the Save File & Generate Hash button, a metadata file with this information will be automatically generated and uploaded to the remote registry. You will notice that the hash will be populated in the component online form.
-
Dependencies. Comma-separated list of component IDs which the component requires. You can find the IDs by browsing the components section.
Press the Submit button. Your wallet will ask you to approve the transaction. Once the transaction is settled, you should see a message indicating that the component NFT has been minted successfully.
Mint an agent
Connect your wallet to the Autonolas Protocol web app, open the agents section and press the Mint button. Fill in the data of your agent:

-
Owner Address. The wallet address of the agent owner (starting with
0x...). It does not need to be the address of the connected wallet. -
Generate IPFS hash of the metadata file. Press the Generate Hash & File button and fill in the following data:
- Name. The name of the agent.
- Description. A description of the agent.
- Version. The agent version, in the format,
<major>.<minor>.<patch>. - Package hash. The remote registry package hash starting with
bafybei...obtained when the agent was published in the remote registry. - NFT Image URL. An URL pointing to an image. You can use this sample image URL for testing purposes.
By pressing the Save File & Generate Hash button, a metadata file with this information will be automatically generated and uploaded to the remote registry. You will notice that the hash will be populated in the agent online form.
-
Dependencies. Comma-separated list of component IDs which the agent requires. You can find the IDs by browsing the components section.
Press the Submit button. Your wallet will ask you to approve the transaction. Once the transaction is settled, you should see a message indicating that the agent NFT has been minted successfully.
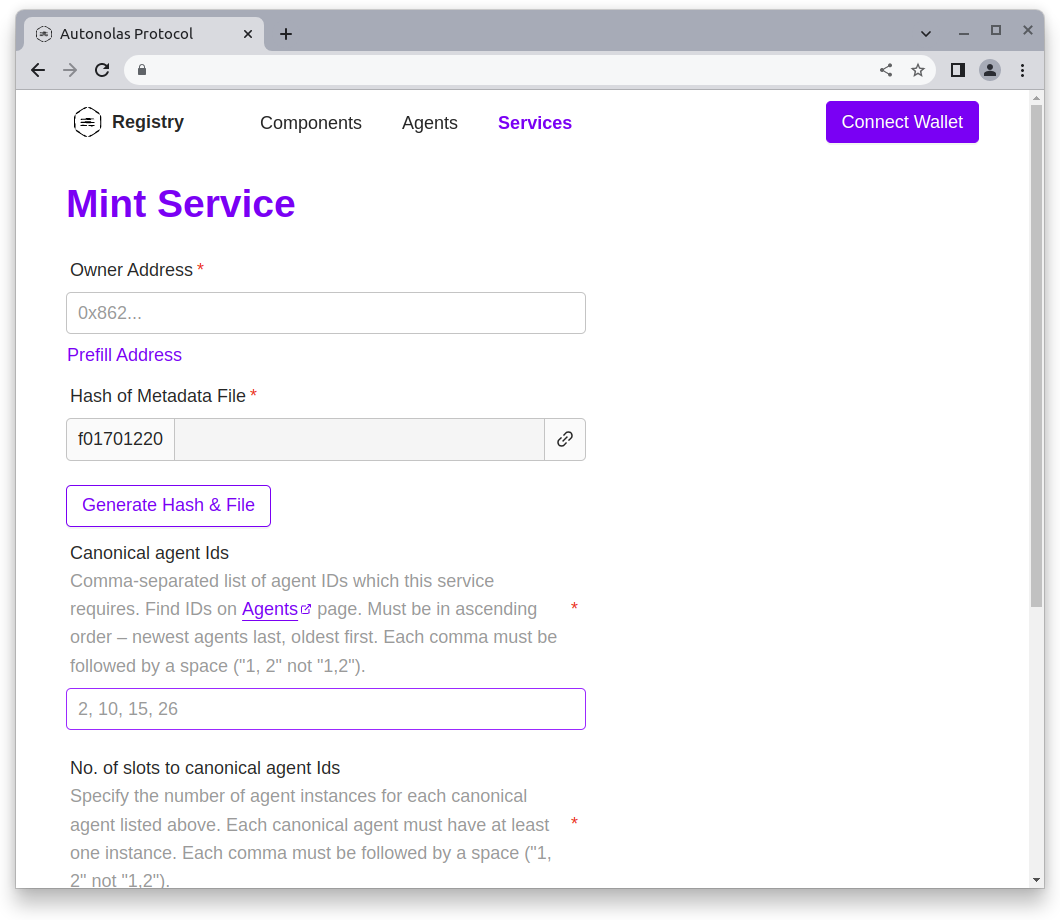
Mint a service
Connect your wallet to the Autonolas Protocol web app, open the services section and press the Mint button. Fill in the data of your service:
-
Owner Address. The wallet address of the service owner (starting with
0x...). It does not need to be the address of the connected wallet. -
Generate IPFS hash of the metadata file. Press the Generate Hash & File button and fill in the following data:
- Name. The name of the service.
- Description. A description of the service.
- Version. The service version, in the format,
<major>.<minor>.<patch>. - Package hash. The remote registry package hash starting with
bafybei...obtained when the service was published in the remote registry. * NFT Image URL. An URL pointing to an image. You can use this sample image URL for testing purposes.
By pressing the Save File & Generate Hash button, a metadata file with this information will be automatically generated and uploaded to the remote registry. You will notice that the hash will be populated in the service online form.
-
Canonical agent Ids. Comma-separated list of agent IDs which the service requires. You can find the IDs by browsing the agents section.
-
No. of slots to canonical agent Ids. Specify the number of agent instances for each agent ID listed above.
-
Cost of agent instance bond. Specify (in Wei units) what is the bond per each agent instance joining the service. If you are using it for testing purposes, we suggest that you use a small value (e.g., 1000000000000000 GörliWei = 0.001 GörliETH).
-
Threshold. Specify the threshold of agents required to sign.
Press the Submit button. Your wallet will ask you to approve the transaction. Once the transaction is settled, you should see a message indicating that the service NFT has been minted successfully. You should also see that the service is in Pre-Registration state.
Once the service NFT has been minted, you can manage the life cycle of the service.